Thursday 25 February 2016

We Are Sure You Would Never Do This, BUT......

How to Unlock Your Android Phones If You Forgot the Unlock Pattern or Passcode

unlock android phoneForgetting your Android phone unlock pattern or passcode can be frustrating, and many users actually end up forgetting it at some point. While there are many solutions posted on the Internet about how to deal with this situation, only a few of them actually work. Some of the solutions that work require you to download apps and install them on your Android phone, others need you to sign in with your Gmail account, and finally, others will reset and erase all of your data from the Android phone, returning it to factory settings.
Depending on your particular situation, you may want to choose a certain solution to bypass your unlock pattern or passcode. If you have just bought the Android phone and did not have time to store any information on it, erasing all of the data will certainly not be a problem. But if you had the Android phone for a long time and have many contacts and personal information stored in it, you may want to look for alternatives. Especially if you haven’t backed up your information anywhere else.
Here are three simple solutions to unlock Android phones that will work for most brands such as Samsung, HTC, LG,etc.

Unlock By Logging Into Gmail account

1. Type the wrong password or pattern for five times
2. After the fifth mistype, an option called ‘Forgot Pattern’ will appear in the bottom right side of the screen – click on it
3. Log in with your Google username and password associated with the respective Android phone
4. You can now draw a new pattern and confirm the change.

Bypass By Downloading Apps

1. Log in to the Android Market on your computer
2. Install the ‘Screen Lock Bypass’ App to your Android phone
3. Install another application – the application will run and disable the screen lock
4. The application runs each time you boot the Android phone and bypass the screen lock.

Reset Phone: Restoring the Android Phone to Factory Settings

1. Switch off the Android phone
2. Press the volume button up and down
3. Press the power button and keep holding it with the volume up button
4. Keep pressing until the terminal interface appears on the Android phone
5. Navigate through the terminal using the home button
6. Choose the option to delete all user data
7. Your device will restart after several moments and it will reboot with factory settings.

A Few Notes Regarding Unlocking Phones When Forgetting Pattern of Password

Be careful if you want to use the last solution to bypass your Android phone’s code, as you will actually lose all information on it, including contacts. Only choose this if you have a backup for any personal or important information. The first option has been known to fail for some users, but others managed to use it successfully. The second option is optimal for most users, but it’s not a solution in itself, as it never changes the password, but it simply bypasses it every time you open your Android phone.

Thursday 18 February 2016

Have You Used Periscope on Android Yet?

How To Create Your First Broadcast With Periscope


A number of blogs back we wrote about 'Periscope Is Now On Android' and in this post we are happy to go into further detail on how to use the application on your phone, what to use it for and why you may want to do all of the above.

What is Periscope?

Before moving into details, let’s remind ourselves of what the app does.
Periscope is a live video broadcast app, owned by Twitter. The goal of the app is to bring live broadcasting to the surface of the popular social network and make sure we can get and record instant video feeds from all over the world in a matter of seconds.

How to install Periscope on Android?

Installing Periscope is a piece of cake and the app can be easily found in the Play Store. Once you have located the app and chosen to install it, you will be presented with quite a lengthy list of app permissions: the app will be asking for access to your camera, microphone, social media and other locations. For a social app like Periscope, these kind of permission requests seem to be well-justified and after approving them, the installation process should move along seamlessly.

How to set up your account?

In order to use Periscope, you will need to set up a Twitter account (provided you don’t have one already). After that is settled, use your Twitter account details to log into Periscope. After approving your Twitter ID, you will need to create a separate username for your Periscope account. After getting this done, the app will offer you a list of people to follow, based on your Twitter contact list.
A great thing about the Android version of the app is the ability to set up multiple accounts. You can do this easily by tapping the Add Account button within the app and then switch between the various accounts as you please.

 Using Periscope: interface

If you are familiar with Tublr, you may find a lot if similarities between it and Periscope interface. You will be presented with a selection of videos, which you can scroll through and tap on to watch.
When watching the video, you will also get a glimpse of the scrollable list of comments in the bottom left corner. Tap Say Something to voice your opinion, ask a question or even give a suggestion to the broadcaster – as all your comments will be delivered to the person filming the video in real time.
A cool feature of Periscope is that you can “like” a broadcast multiple times (unlike on Facebook or Instagram). By tapping the video, you give it a “heart”– and you can tap as many times as you want, creating a sort of applause wave for the video creator.
You can manage the content you see through the three icons on the main screen.
“TV” will show you the current broadcasts being filmed by those on your contact list.
“Globe” presents a random selection of broadcasts from around the world.
“People” will offer you a list of the most popular users.
“Person in circle” will show you own profile, letting you know how many followers you have and who they are.
At the bottom of the main screen, you will see Settings. Through this menu item, you will be able to manage your notifications and broadcasting options.
Note: you can choose to autosave your broadcasts in the camera roll, as Periscope deleted the data after 24 hours.

How to create your first broadcast?

When looking through any video feed, you will notice a red camera icon in the bottom right corner of the screen.
  • Tap the red Record button to begin your own live broadcast.
  • You will be asked to give your video a title – try to make it clear and relevant, so that your followers know what it is about.
  • You will be offered two options: making your broadcast Public or Private. A public broadcast will be available to everyone, while a private one can only be seen by a selection of people from your contact list.
  • Under the title line, you will be able to toggle on or off three more options: location (allowing or not allowing people to see where you are), enabling or disabling comments for the broadcast and the option to share or not to share the broadcast on Twitter.
  • With all the settings settles, press Start Broadcast to begin.
Important: make sure to have a reliable Wi-Fi connection before starting the broadcast in order not to rack up your phone bill

www.worldofelectronics.ie

Thursday 11 February 2016

Make Sure You Put This on All Your Android Devices

How To Use Android Device Manager To Locate Your Phone

Androif Device Manager
It’s better to be safe than sorry – this is a known fact of life. And the truth is, you can usually easily protect yourself from unpleasant situations with just the minimum precautions. Say, losing your phone- with just a few simple steps you can minimize the damage caused by the loss or even avoid it altogether. And while we hope you will never have to use it – here’s a helpful step-by-step guide on how to use Android Device Manager to locate or disable a lost phone.

As we most applications, the starting point is at Google Play Store, where you’ll have to go to download Android Device Manager. For that, you will need a Google Account and just a few minutes of your time. Here we go.
  1. Download Android Device Manager
  2. Go to your Settings>Security and allow the app to act as Device Administrator (this way it will have the power to lock or wipe your phone). To download the app, as well as to sign into it, you will need to use one of your Google accounts.
  3. Once you sign in and unless you have multiple phones linked to the same account, you should see your location and the make and model of the phone you are currently using.
  4. Now we get to the painful stuff, what happens if you can’t find your phone.
First thing you do, is go to the Android Device Manager website and sign in with your Google Account. If you phone can be located – you will be able to choose from a few available options.

Option One: Ring

The ting option will do just that – ring your phone. But it will do so non-stop for 5 minutes, letting your phone “scream” at full volume. You can then use the sound to get close to your phone (if it’s lost somewhere in the room) or spot a pick-pocket, if he hasn’t got too far from the crime scene.

Option Two: Lock

The Lock option will allow you to change the PIN or password on your phone or set one up if you didn’t have one before. This is a good way to make sure that whoever got your phone will not get to its contents or if you have reason to believe your friend may be playing a prank on you and is using your account to post obscene pictures on Instagram.

Option Three: Erase All Data

If you’ve given up hope on finding your phone or left it somewhere you are not willing to go back to (think “Silent Hill”) – the best and only option you may have is to erase all data on your phone. Once you choose this option, everything on your phone will be gone, including Android Device Manager (oh, the irony) and you won’t be able to track your phone any longer.

www.worldofelectronics.ie

Thursday 4 February 2016

Giving you a Great Experience on Your Android TV

How To Install Kodi / XBMC On Your Android Device

4.8.2015. | 14:47
Kodi is a trademark of the XBMC foundation and is also used to describe the media player formally known as XBMC,  a cross platform, free, open source media center that is great for home theater PC’s, Android TV boxes and lets the user interact through a GUI to browse, download and play podcasts, movies, TV shows and music from a hard drive, local network or the internet.  This free software is available for most Android devices running version 4.2 or later of the OS and using an ARM or x86 SoC, for more info check here.
The easiest method of installation is from the Google Play store. Just search for Kodi. The Google Play app should automatically select the correct version of the Kodi player be it ARM or x86 automatically. If however this isn’t an option and you don’t have access to Google Play on your device or region you can follow the method below.

Enabling Installations

Step 1. First navigate to the settings menu on your android device and find the security menu.
Step2. From the security menu select “unknown sources” so as the option is now enabled.
This will now allow you to install apps from unknown sources
XBMC Step2

Download the Kodi APK

Step1. Open up the internet browser on your device and head over to the Kodi Webpage. http://kodi.tv/download/
Step2. Select the ARM or x86 Version depending on your hardware. Most users will need to select the ARM link unless they have a device running an Intel or AMD CPU, If you are unsure of your hardware check the user manual or manufacture webpage.
Step3. Wait for the .apk file to download from the webpage
XBMC step03

Installation of the .apk file

After the download is completed you need to locate the .apk file.
You can do this from the download menu in your browser or from a file manager / explorer package.
Step 1. Once you have located the .apk file you want to select it. At this point you will probably be offered an option asking what program to open this file with. Such as “Package installer”.
XBMC step 5
Step2. After selecting an installer option you will be shown a prompt asking for permission to install the application. Confirm you want to install the package.

Step3. You may well get a progress bar and you should wait on this screen until the program is installed.

Step 4. Once the installation has been completed you will get a prompt on the screen and there should be an option at this point to open the software. Select this option and open the newly installed software.

Step 5. When the software is fist installed it will take longer than usual to open, this is because on the first run the program will need to finish its setup and make some final adjustments to ensure its runs correctly on your device.
XBMC step 6

Your finished.
Now you will be presented with the Kodi / XMBC home screen and from here you are free to start enjoying streaming of music, to movies and more. Just sit back and enjoy.

Thursday 28 January 2016

If you Want a Really Strong Password This is How to do it

How to Create Strong, Secure, Passwords You Can Remember

Secure-Password

Chances are if you’re reading this you have some sort of password, whether it’s for your e-mail account, Wi-Fi or any one of a thousand other accounts that require a secure password.
As devices are getting more mobile we’re using them in more and more places which increasingly exposes us and our passwords to would be thieves who may wish to obtain our “secure” information.
Passwords should ideally be unique and each account you have should use a different password. Not just a little different but totally different and that’s where we encounter problems. The more accounts you have the more unique passwords you need to remember and we’re always told that these passwords shouldn’t be common words or things like our date of birth that could be easy to guess or work out. If the word you use can be found in a dictionary then it can be easily worked out as these are the words that most hackers or software will check first when trying to crack your password.
Similarly if the letters appear in order on your keyboard such as “123456” or “qwerty” then it’s not a strong password. You also need to avoid passwords that can be easily guessed such as the name of the street you live on, a favorite sports team city or the university you attended, the name of a loved one or their date or birth, all of these would be deemed weak passwords. A few of the most common passwords and terms to avoid are: – “god,” “money,” “love,” “monkey,” “letmein,” and if you use “password” as your password then you may as well not have a password at all.

So how do you create a Strong password that you can remember, well strong passwords should contain upper case and lower case letters they should also contain some numbers and special characters as this covers the full range of text available to us, below are some examples for each.
Character category Examples
Uppercase letters A, B, C
Lowercase letters a, b, c
Numbers 0, 1, 2, 3, 4, 5, 6, 7, 8, 9
Symbols found on the keyboard (all keyboard characters not defined as letters or numerals) and spaces ` ~ ! @ # $ % ^ & * ( ) _ – + = { } [ ] \ | : ; ” ‘ < > , . ? /

You should then consider length; many passwords have to be at least 8 characters long so aim for at least this and preferably 12 characters or more.
So with this in mind how do you create an easy to remember password. Well think of an easy word to remember such as “dinosaur”now when you type it move every letter one to the right. So “dinosaur” becomes “fompdsit”.
Now add some upper cases “FompdsiT”
Now add some numbers “F0mpds1T”
Don’t forget some symbols “F0^^pd$1T”
Just remember the pattern for you capitals, numbers and symbols in this case.
Capitals                               =                             First and last letter.
Numbers                            =                             Second and Second from the end.
Symbols                             =                             Third and third from the end.
This may not be so easy if you have to enter the password on your phone so you could try picking a word or name something easy to remember then spell it backwards. So “New York” becomes “Kroywen”. Then swap some letters for numbers and symbols so you could end up with “Kr0yw3^”
Changing the letter ‘O’ for ‘0’, ‘a’ for ‘@’ or ‘e’ for ‘3’ are obvious so you can make it more complicated, just make sure your replacements make sense so as you can remember them.
Another easy way to create a password you can remember is pick a phrase and then use the acronym of this, after change some letters to capitals, symbols and numbers to make it more secure and you have a strong password.
If you’re worried your password isn’t strong enough there are sites that let you type in your password and they will measure how strong it is. You can click here to visit one of them.
You can even personalize your passwords for your accounts so your email password could be “Kr0yw3^EMA” for example and your Facebook password could be “F0^^pd$1TFAC”. If you follow these tips you should be able to create strong and secure passwords that are easy to remember.

www.worldofelectonics.ie

Thursday 14 January 2016

Keeping your Wallet Safe from the Kids!

How to Prevent your Kids from Buying on your Google Play Account

5.8.2014. | 17:25
Google-Play-Update
I recently wrote about the importance of having a strong and secure password but sometimes that’s not enough. If you have set your Google Play account to remember your password then anyone who gets hold of your phone could potentially rack up huge bills on your account.
There have been many headlines in the past 6 months regarding children racking up huge bills on Apple and Amazon App stores and the same could be true for your Google Play account if you don’t take care.
The usual default setting for Google Play Accounts is for the store to ask for your password the first time you use it. After that you are prompted to choose what password settings you would like and if you selected the options “to never be prompted for your password again” or for you to have a 30 minute log in period after you type the password then it’s very easy for unwanted purchases to be made.
If you’re unsure of you Google Play Settings or would like to make sure that unwanted purchases can’t be made then you can follow the simple step by step instructions below to set your account t to ask for your password “ for all purchases” and this will stop unwanted purchases from stacking up on your account.
If your worried about forgetting your password then check out our blog “How to Create Strong, Secure, Passwords You Can Remember”.

Step By Step Guide

  1.  Open the Google Play Store app.
  2. Touch the Play Store icon > Settings.
  3. Under “User controls,” touch Require password for purchases.
  4. Choose a password setting.
    • For all purchases   ( recommended )
    • Every 30 minutes
    • Never
  5. Type your password.
Also, if you use the “Every 30 minutes” setting, you can review your password settings by selecting the Change settings link that displays after you’ve made a purchase.
If you’re unsure of your account log in details then you can click to visit the account Recovery Page for Google Play Accounts.

Tuesday 5 January 2016

Keeping Kids Safe on Android

How to Create a Safe Friendly Android Experience for your Children

You may know how to protect your child by putting parental control on their cell phone but here is how you can set up a child friendly Android Tablet and make sure that they are safe when using the device unsupervised.
Child with glasses using a laptop computer
Source: http://www.howtogeek.com

Whether your child has their own Android device or shares one with you or other members of your family, you should always make sure they have their own account set up wherever possible.
By setting yourself, or another responsible adult, as the primary user (administrator) you can subsequently set up additional restricted accounts for your child.
With a Primary account you will have administrative controls over any restricted accounts so can select what apps they can see and interact with giving you control over the content that is available to them.
Unfortunately many older Phones and some Tablet PCs have this feature disabled by the manufacturer. To enable it you may even need to root your device, which should probably be left to experienced uses or professionals.
If you’re unsure you can always check the menu options.

Setting up Additional User Accounts

To set up a new user on your device go to the settings menu, then under the device sub list you should see a users option, tap this.
You will now be presented with a list of current users and the option to add another user.
Select the add user option, and then be sure to select Restricted Profile in the options that pop up.
profile-add
You will also be able to toggle the app you want this account to have access to. With apps that have a gear or cog icon next to them there are additional option that you can set, such as in the Google Play store you can select options for paid apps and content to make sure that only age appropriate information and apps are displayed.

After setting all this up you will need to decide whether to add a current Google Account for this user or create a new one for this user.
Google uses a single account for everything this will include access to apps, emails and social network. Creating a new account under your child’s name will give them control of whatever apps, music and movies they want to download without it overriding your settings or spilling additional data into your own and other accounts on that device.

Play Store Parental Controls

Source: lifehacker.com
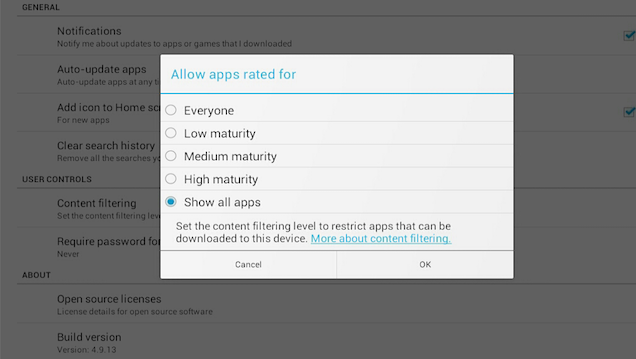
Whichever option you choose you should be certain to set up Google Plays Parental access controls on any account they have access to. These controls are located under the Settings > User menu and will need you to be logged into the Google account. The Play Store app will request a PIN code to be entered and confirmed. Make sure you keep this PIN code a secret and safe. Once setup this will restrict the content displayed in the Google Play store letting you set rating limitations for app and music content as well as controls over payments for Play store purchases so they can’t rack up astronomical fees on a Play Store Account.

Parental Control Apps

If you’re seek further controls over you child’s Android use and are not available to monitor their usage first hand then you may like additional support from 3rd party apps. These can let you set usage time restrictions so children can only use a tablet between given hours of the day or for a set amount of time. They can let you block specific apps and web sites and even track and report on activity so you can see just how your kids are using the device and how much time they spend on different apps, games etc. There are plenty to chose from many of them free or at very low prices so whether it’s a phone, tablet, or TV box you can keep your children safe while they learn and play.