How to Set up a Mobile Hotspot with Android 4.4
So you need to connect something other than your phone to
the net but there is no Wi-Fi or network around for you to connect to.
Easy just set up a Mobile Hotspot with your phone. Setting up a Wi-Fi hotspot on Android 4.2 was easy and while it can still be done on Android 4.4 the menus and method can be a little different.
A Mobile Hotspot is an easy way to use a cellular data connection (Such as 3G / 4G data) on your phone or tablet and share it over Wi-Fi with other Wi-Fi devices such as your laptop so as they can access the internet via your phones cellular connection when no other networks are available.
Don’t worry its quick and easy to follow this short guide to setting up your own portable mobile hotspot.
1) As a mobile Wi-Fi Hotspot can use a lot of power its best to plug your phone into an electrical output so as you don’t run your battery down.
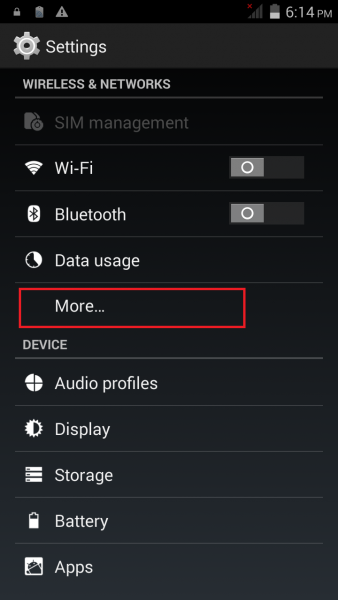
2) On your Android 4.4 Phone go to the settings menu
3)Under the Wireless & network options you will see more at the bottom, click on this and then you should be able to see a menu labeled tethering & Portable hotspot.
4) Click the Tethering & Portable Hotspot option and the menu opens, and then select the WLAN hotspot option.

*note, the menu options may be named slightly differently depending on your phone and version of Android but if you can open your wireless network options you should be in the right place.
5) There should be a Set Up WLAN hotspot or Set UP Wi-Fi hotspot option.

6) You will then be presented with a setup that has Android AP or perhaps your phones name as the Network SSID, you should change this to make it easily recognizable.

There will also be a Security option as well as a password field. Make sure you have a security setting like WPA2 PSK selected and be sure you use a secure and easy to remember Password.
Once you click save you will go back to the previous menu. Check the Wi-Fi hotspot is enabled and if so you will see a little symbol like the one shown here appears at the top of your phone.

That’s it, it was easy wasn’t it? You can now search for this network using other Wi-Fi enabled devices, find the correct Wi-Fi hotspot name (SSID) and select connect, enter that password and you will be connected to your phone and be able to share its cellular network service. This can be really good when you have a 4G phone as the download speeds are truly fantastic allowing for several device to easily connect to you portable Wi-Fi hotspot and enjoy downloads much faster than you would get with 3G ad in many cases faster than using an Ethernet broadband line.
You should remember that the range for a mobile hotspot is about 10 meters or 30 feet. this can be greatly effected by walls and other obstacles as which can greatly reduces the range.
Data usage fees apply when using a mobile hotspot, your cellular provider may charge on top of a basic service so check with them first. sometimes it can be cheaper to have a monthly data download package.
Don’t forget to turn of your mobile hotspot once you have finished using it. otherwise you could rack up additionally data usage as well as needlessly drain your phones battery.
Disable automatic updates or downloads on each device you will connect to the network. This is a must if you have a limited download allowance and wills stop your laptop or tablet from downloading large amounts of data.
A Mobile Hotspot is an easy way to use a cellular data connection (Such as 3G / 4G data) on your phone or tablet and share it over Wi-Fi with other Wi-Fi devices such as your laptop so as they can access the internet via your phones cellular connection when no other networks are available.
Don’t worry its quick and easy to follow this short guide to setting up your own portable mobile hotspot.
1) As a mobile Wi-Fi Hotspot can use a lot of power its best to plug your phone into an electrical output so as you don’t run your battery down.
2) On your Android 4.4 Phone go to the settings menu
3)Under the Wireless & network options you will see more at the bottom, click on this and then you should be able to see a menu labeled tethering & Portable hotspot.
4) Click the Tethering & Portable Hotspot option and the menu opens, and then select the WLAN hotspot option.
*note, the menu options may be named slightly differently depending on your phone and version of Android but if you can open your wireless network options you should be in the right place.
5) There should be a Set Up WLAN hotspot or Set UP Wi-Fi hotspot option.
6) You will then be presented with a setup that has Android AP or perhaps your phones name as the Network SSID, you should change this to make it easily recognizable.
There will also be a Security option as well as a password field. Make sure you have a security setting like WPA2 PSK selected and be sure you use a secure and easy to remember Password.
Once you click save you will go back to the previous menu. Check the Wi-Fi hotspot is enabled and if so you will see a little symbol like the one shown here appears at the top of your phone.
That’s it, it was easy wasn’t it? You can now search for this network using other Wi-Fi enabled devices, find the correct Wi-Fi hotspot name (SSID) and select connect, enter that password and you will be connected to your phone and be able to share its cellular network service. This can be really good when you have a 4G phone as the download speeds are truly fantastic allowing for several device to easily connect to you portable Wi-Fi hotspot and enjoy downloads much faster than you would get with 3G ad in many cases faster than using an Ethernet broadband line.
You should remember that the range for a mobile hotspot is about 10 meters or 30 feet. this can be greatly effected by walls and other obstacles as which can greatly reduces the range.
Data usage fees apply when using a mobile hotspot, your cellular provider may charge on top of a basic service so check with them first. sometimes it can be cheaper to have a monthly data download package.
Don’t forget to turn of your mobile hotspot once you have finished using it. otherwise you could rack up additionally data usage as well as needlessly drain your phones battery.
Disable automatic updates or downloads on each device you will connect to the network. This is a must if you have a limited download allowance and wills stop your laptop or tablet from downloading large amounts of data.
